Blog

Begin Streamlining Your Team’s Processes with Mapping

Is your business facing any of these issues?

Customer complaints about product quality, Customer complaints about poor service, Frustrated colleagues, Duplicated work, Work not done, Wasted resources & Production bottlenecks.

It may be time to update some of your processes. Here’s how to get started. 

Once you’ve discovered in which area the breakdown occurred and identified the processes involved, you’ll have to determine which process (or processes) are causing the issue.  When you decide which one you want to tackle first, begin by documenting each step in the current process.

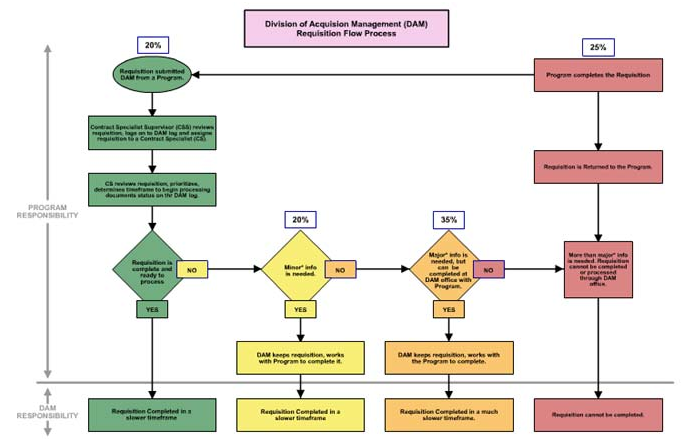
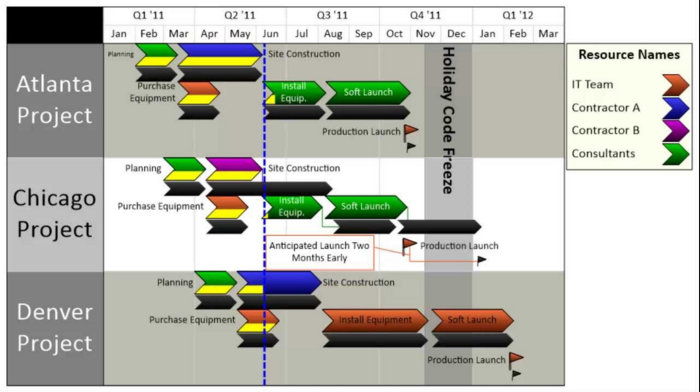
Two useful tools are the Flowchart and the Swim Lane Diagram. These tools show the steps in the process visually.

Flow Charts

Flow charts are the more familiar of the two. They are easy-to-understand diagrams that show how the steps in a process fit together in the proper sequence. Their simplicity makes them useful tools for communicating how processes work, and for documenting how to do a particular job. They can be a good planning and analysis tool as well. Sometimes just the act of mapping out a process using a flow chart can clarify your understanding of it. And that can help you make improvement, too

Team leaders and supervisors often use Flow Charts to record the sequence of tasks in a particular process. It is often used in a training setting to help new or inexperienced team members understand the process, and complete activities in the right order.

VI June Blog

Swim Lane Diagrams

Swim lane diagrams are slightly more complex than flowcharts. They were proposed by Geary Rummler and Alan Brache in their 1990 book, Improving Processes. This diagramming method allows you to plot and trace processes, and especially the interconnections between processes, departments and teams.

The unique feature of Rummler-Brache charts is the use of horizontal rows across the diagram page. Picture a swim meet where each swimmer has his or her own “swim lane.”  Using this diagramming method, each “swim lane” indicates an individual, a team, a department, or any other organizational unit. They are a great tool to help discover processing gaps and inefficiencies, with the added advantage of focusing on those high risk interconnections between departments and teams. This can help you spot more clearly any “hand-off” issues between responsible parties.

VI June Blog 1

With both mapping methods it’s important to explore each phase in detail, as some processes may contain sub-steps that you’re not aware of. Consult people who use the process regularly to ensure that you don’t overlook anything important.

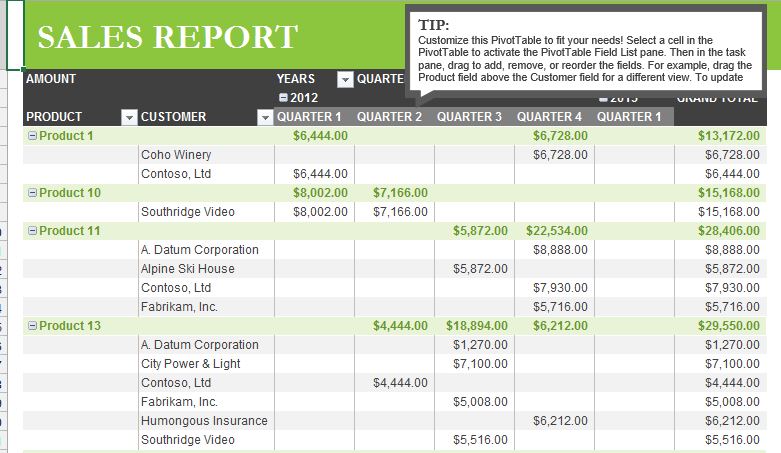
The Microsoft Office Suite has several applications (PowerPoint, Excel, Visio) that can help you create process charts and there are add-ons available in the marketplace that can make the job even easier.

Visual Integrators can help you eliminate inefficiencies and simplify your business by automating your office processes. Call today to find out how!

Visual Integrators

753 Sussex Ct, Sykesville, MD 21784

(410) 549-9685

Creating a Watermark in Adobe Acrobat

What is a watermark?

watermark is text or an image that appears either in front of or behind existing document content. It is integrated into your PDF pages as a fixed element. For example, you could apply a “Confidential” watermark to pages with sensitive information.

Why use a watermark in your PDFs?

A watermark can be an easy way to enhance the appearance of the document by adding a seal, logo, or image to the background of your text. Or you may want to add a text watermark to a document like Draft, Confidential, or Do Not Copy to protect information. Watermarks like DRAFT and FINAL COPY are especially useful when collaborating on a document with others.  Watermarks can also be used to discourage those who would borrow the document without authorization. This is very commonly done with photographs. Ultimately, the watermark feature in Adobe Acrobat is a great tool for communicating additional information.

You can add also multiple watermarks to one or more PDFs, but you must add each watermark separately and you can specify the page or range of pages on which each watermark appears.

Here’s how do create a watermark in Adobe Acrobat XI

  1. Select Tools > Pages.
  2. Under the Edit Page Design heading, select Watermark > Add Watermark.
  3. Configure the desired watermark settings.

NOTE: You can use the Save Setting button to save and name watermark settings for use again in the future.

VI Blog 3 May

4. Click on Page Range Options and select the desired page range.

Page Range Options

5. Click OK

6. Click on Appearance Options and check the appropriate boxes.

Appearance Options

7. Click OK.

8. Click OK again to apply your watermark.

Finished product.

Summary

If you want to add a photo or picture as a watermark, only PDF, JPEG, and BMP images can be used as watermarks in Adobe Acrobat.

Watermark

These document watermarks are not to be confused with Digital Watermarks whereby identifying data is woven into media content such as images, movies, music or programming, giving those objects a unique, digital identity that can be used for a variety of valuable applications. Imperceptible to the human senses yet easily recognized by special software detectors, a digital watermark remains constant even through recording, manipulation and editing, compression and decompression, encryption, decryption and broadcast — without affecting the quality of the content.

Many commonly used applications, like MS Word, Excel, PowerPoint and Adobe Acrobat all provide tools to easily place watermarks into your documents. They have a multitude of purposes and can add efficiency to many common office procedures.

Visual Integrators can help your business increase its efficiency and productivity by automating and designing systems around your office processes. Call today and find out how they can help you increase your bottom line!

Visual Integrators

753 Sussex Ct, Sykesville, MD 21784

(410) 549-9685

Creating MS Word Forms with Content Controls

Want to have more control over what data can be entered into a company form and where? No problem. You can create a form in Microsoft Word and add content controls, like check boxes, text boxes, date pickers, and drop-down lists. You can even start with a downloaded template to make it even easier. There are lots of free templates online on the Office.com website. Other people can then use their MS Word application to fill out the form on their computer and either print it out or save it to a shared folder for data collection purposes.

Once you’ve decided on a form or template to customize, you’ll need to show the Developer Tab to reveal all the available content controls. Here are the steps:

  1. Click the File tab.
  2. Click Options.
  3. Click Customize Ribbon.
  4. Under Customize the Ribbon on the right, click Main Tabs.
  5. In the list, select the Developer check box, and then click OK.

Now the Developer tab will appear on the Ribbon and you’ll have access to all the Controls commands.

Let’s start with the date. If you want to control how the date is entered into your form, month-day-year for example, you can insert a Date Picker. A date picker provides a calendar interface from which the user can select a date. The calendar appears when the user clicks the drop-down arrow in the control. You have control over the regional calendars and different date formats that can be used.

Then maybe you want your users to be able to select a product/service from a list, but only very specific selections. You can use a drop-down list control to and limit the choices to only those items on sale for example. The user must pick from the list and cannot add any other choices. If you do want them to be able to add other items by typing them in, you would use a combo-box control. A combo box displays a list of items that users can select and unlike a drop-down list, the combo box enables users to add their own items.

Now let’s say you want people to be able to type in comments but only in a designated text box on your form. You can insert a rich text content control where users can enter and format text as bold or italic, and they can type multiple paragraphs. If you want to limit what users add, insert the plain text content control. A rich text control can contain text or other items, such as tables, pictures, or other content controls. A plain text control contains only text and cannot contain other items, such as tables, pictures, or other content controls. And all of the text in a plain text control has the same formatting.

All of these controls will be inserting into your document at the insertion point. To set the user’s choices for the control you will select the content control, and then on the Developer tab, in the Controls group, click Properties. Here are the steps to create a list of choices for the Drop-Down list control.

  1. To create a list of choices, under Drop-Down List Properties, click Add.
  2. Type a choice in the Display Name box, such as Yes, No, or Maybe.
  3. Repeat this step until all of the permitted choices are in the drop-down list.
  4. Fill in any other properties that you want.

Note:  If you select the Contents cannot be edited check box, users won’t be able to click a choice at all.

It’s as simple as that. Now you can experiment with the other controls and construct your forms to fit your specific situation. Save the form as a template and put it where users can access it. It will start out clear and ready for new choices each time it is used. The completed form can then be saved with a new name and you can begin collecting your data.

Content controls provide a user interface that is optimized for both user input and print. When you add a content control to a document, the control is identified by a border, a title, and temporary text that can be used to provide instructions to the user. The border and the title of the control will not appear in printed versions of the document.

In an advanced scenario, any content controls that you add to a form can also be linked to a specific data source or sources. This can both offer the specific entry choices and collect data from the completed forms. Visual Integrators can help you automate your data collection. Call for a free consultation today!

Visual Integrators

753 Sussex Ct, Sykesville, MD 21784

(410) 549-9685

Web Application vs. Website

How is a web application different from a website?

While both need a browser and internet connection, a website is defined by its content, while a web application is defined by its interaction with the user. A website typically consists of a static content repository that’s displayed to all visitors, while a web application depends on interaction and requires user input for data processing. Website content can and does change, of course. And it can even be programmed to include variable content, like a stock market ticker for example. But for the most part it displays information that is stored in its pages. A web app on the other hand, needs input from the user in order to perform its function – data processing.

CNN.com and VisualIntegrators.com would be websites. They are meant to be informational, showing the same information to all visitors. A collaborative calendar, like Google Calendar for example, is a web application. Users can do things like share their schedule, invite others to meetings and track RSVPs, too. All of this requires input from the user.

Naturally, most websites with quickly changing content will also rely on a sophisticated backend, but at least in principle they’re only defined by their output. The web application on the other hand is essentially a program that runs remotely, and it depends fundamentally on a processing and data storage backend.

There are lots of advantages to web apps. They can be accessed from the office, at home, on the road and from remote locations. All that is needed is a browser application and an internet connection.

Here are some other advantages:

  1. Most of your information is safely stored on a server somewhere instead of the laptop you forgot at home
  2. You don’t have to worry about current versions or OS compatibility
  3. No need to be concerned about different versions for Macs and Windows (Most web based applications are far more compatible across platforms than traditional installed software.)
  4. No worrying about installing updates
  5. No disk space (or very little) is taken up on your computer or device
  6. You can use your application on different computers
  7. You can use a web app on your work computer, your home computer, laptop, tablet, and maybe even your phone

Many web apps can be synched with your desktop applications, too. For example, you can access your Google Calendar however and whenever you want by syncing events with other applications such as Microsoft Outlook, Apple iCal and Mozilla Sunbird. You can keep track of RSVPs from those on the road at your desk back in the office.

Web based applications have come a long way and now offer many competitive advantages to traditional software based systems allowing businesses to consolidate and streamline their systems and processes and reduce costs.

Whether you’re thinking about streamlining your business processes with dynamic web pages or web applications that can save/retrieve/update information from/to a database, Visual Integrators can help.

Call today to find how a web based application could work for you!

logoHome

753 Sussex Ct, Sykesville, MD 21784

(410) 549-9685

Should You Be Using MS One Note?

If you do a lot of notetaking on the job, attend more than one meeting each week, or collaborate with others on projects, MS OneNote can keep all those notes neat and tidy in one place. While there is nothing wrong with pen and paper notes, going digital comes with lots of benefits. All your notes and white board pictures are searchable inside OneNote, they’re stored in the cloud, and immediately accessible via the OneNote apps from your phone, laptop, note pad or any platform. Compared to other similar note taking software, you’ll often hear it said that OneNote is more intuitive and conducive to productivity.

OneNote really is a great productivity aide, with its focus on typing and hand-writing notes, audio recording and search tools, and especially its smart integration with the rest of Office. OneNote’s organizational structure clearly mimics physical note-taking, revolving around notebooks, tabs, and pages. Sound like high school? It’s as simple as that. You can have multiple notebooks, one for each committee you belong to, or each project you’re working on. Across the top of each notebook are tabs, representing different sections — Goals, Assignments, To-Do’s for example. The sections hold the line-by-line notes and are listed down the right side. You can also nest a note under another note, which keeps related items together or maybe breaks up a long list. This organizational tool works especially well for dividing up delegated work tasks.

There’s also a tab called QuickNotes for new notes. Use the Windows + N command and save a descriptive screenshot to OneNote.  And you can easily share a notebook with others by clicking File > Share > Invite People in the notebook you wish to share. Your team members and reports can then see what transpired in the meeting, what assignments they may have, and even what changes to the project goals have been made.

While you can import handwritten notes as images into OneNote, one thing that separates OneNote from others is the ability to draw and write notes by hand right inside the application. OneNote tools include pens and highlighters of varying colors and thicknesses, lines, arrows, shapes, graphs, and an eraser for when you make any errors.  (Just in case.)

OneNote also has a feature called Templates, where you can create and edit your own preset page layouts. If you use a preset format for a certain type of notetaking, like a meeting agenda, lecture notes, or design annotations this will definitely save you a lot of time.

Visual Integrators can save you a lot of time, too.  That’s what we do. We make technology work for you! Call or click today for a free consultation.

 logoHome

410.549.9685


Save Time with Word Templates

If you often create a certain type of document, like a monthly report, a sales forecast, meeting minutes, or a customer thank you letter, you don’t have to create it from scratch each time. You can save it as a template and use that as your starting point instead. Start with a document that you already created, or even one you downloaded and customized.

First, you’ll want to make your document “generic.” For example, in a customer thank you letter you can leave your company name, address and phone number at the top, but remove the customer’s address info. Be sure to remove the name any other place it appears as well.  Do the same with dates and anything that will change from one time to the next.  You can leave Dear ___ but remove Mr. Jones. If you write lots of letters with the same purpose, you can produce some generic “boilerplate” language and leave it as part of the template for next time.

Once you have “genericized” your document, go to File/Save As, pick a location (it will change to the Custom Office Templates folder later) and give it an appropriate name. Then click the drop-down arrow to the right in the Save as type drop-down list box and select Word Template. You will now see the storage location change at the top of the screen to Custom Office Templates. Click Save and you now have a document you can use again and again without having to type so much!

To get back to your new template, open Word and go to File/New. There you will see some featured templates and a place to search online for existing templates. Instead, click Personal and your saved templates will be displayed.  Just click the one you want. Voila! Your saved template with all that boilerplate text opens as a new, unsaved document – note the title bar says Document XX. (the number will vary) When you save this one it will not alter your template, but create a new file document file instead.

Once you’ve mastered templates, you’ll want to try creating interactive documents. You can choose from a range of predefined options for data, and save yourself even more typing. If you generate electronic data-entry forms, produce documents with boilerplate language, or find yourself typing the same phrases over and over, wouldn’t it be convenient if your documents were already partially formatted and allowed you to make selections from drop-down menus instead of copying and pasting from documents you created earlier?

Stay tuned for next month’s blog, Creating Interactive documents.

Visual Integrators is a Maryland-based IT company specializing in Microsoft automation and programming services. We would love to save your business time and make technology work for you. Call or click today for a free consultation.

logoHome

410.549.9685

Work Flow Planning

What is workflow and why is it important to understand it?

According to BusinessDictionary.com, workflow is a “progression of steps (tasks, events, interactions) that comprise a work process, involve two or more persons, and create or add value to the organization’s activities.” These are processes that occur in the work environment and the steps are commonly broken into two types: sequential and parallel. In a sequential workflow, each step is dependent on the previous step; in a parallel workflow, two or more steps can occur at the same time. Whether sequential or parallel, all activities will eventually affect each other and the project as a whole, and workflow is sometimes described as simply a series of steps that produce an outcome.

Workflows help people, individuals, departments, teams, etc., to collaborate on projects and manage project tasks by implementing business processes, sometimes on documents, development tasks, production tasks or other steps to bring about the completion of a process that creates value to an organization. Workflows help organizations to adhere to consistent, repeatable business processes, and they also improve both organizational efficiency and productivity by managing the tasks and steps involved in business processes. This enables the people who perform these tasks to concentrate on performing the work rather than managing workflow.

Workflows are important because they streamline the cost and time required to coordinate common business processes, project approval or document review for example, by managing and tracking the human tasks involved with these processes.

Another important benefit of workflow systems is that they also provide a structure for a business to measure and analyze the execution of the process as it happens so that continuous improvements can be made along the way. They may be short-term improvements, like reallocation of the workload, or they may be long-term, like redefining portions of the workflow process to avoid bottlenecks in the future.

Many workflow systems also integrate with other systems being used by the organization. Examples are document management systems, databases, e-mail, office automation products, Geographic Information Systems, production applications, and many others. This integration gives structure to a process which depends on a number of otherwise independent systems. One of the major benefits of integration is that it can also provide a method or place for organizing project documents coming from any or all of the afore mentioned sources. And that can be a real advantage.

All good workflow systems include a Process Definition Tool. This may be either a graphical or textual tool for defining the business process. A flow chart is a good example. It depicts each step in the process and indicates whether they occur concurrently or sequentially. Furthermore, each activity within the process is associated with a person or a computer application. It could be as simple as Bill gives the report to Mary. Or maybe Bill launches a pre-programmed computer application to gather and correlate data. Rules are also created to determine how the activities progress across the workflow and what controls are in place to govern each activity. Some workflow systems allow dynamic changes to the business process by selected people, those with administrative clearance for example.

There you have a basic overview of a business workflow system. Now an automated workflow system, once put in place, can simplify the process even more. That’s where an automation expert can help.

Visual Integrators provides custom technology solutions for all business types and sizes. They will automate and design systems and processes around your unique business needs. Call today for your free consultation!

logoHome

410.549.9685

Pivot Tables

Pivot Tables

Pivot Table

What’s the most power tool in MS Excel? That’s easy – pivot tables.  No other Excel tool gives you the flexibility and analytical capability of a pivot table. They allow you to work with and compare summarized data (key term) from an Excel list or table, regardless of how it was originally arranged, i.e. you can drag and drop columns and rows into your pivot table to reconfigure how your data is related. You can even arrange additional columns as sub-data with a larger category, like breaking down appliances sold into stoves, washers, dryers and refrigerators.

When you get the rows and columns the way you want them, you can then work the numbers. Perhaps you want to know the number of each appliance sold, the percentage of total sales represented by each and the total revenue generated by each on, too. No problem, you simple “pivot” the table by changing the calculation performed of the value field of your table. And this is all done in a flash without having to manipulate your original data at all.

Speaking of original data, it can come from another worksheet in your Excel workbook (file), another workbook, multiple workbooks, or external data can even be downloaded from a company database. In other words, you can probably use data you’re already collecting, as long as it is put into a simple Excel list format. Here are some tips about that format.

  1. Leave no completely blank rows or columns
  2. Do not include subtotals
  3. Make sure each field (cell) contains data. Try to avoid nulls. Use NA when possible.

Tip: If the number of pieces of data you collect for analyzing is likely to vary each time ( e.g. weekly, monthly, yearly), you can create an Excel Table that will expand or shrink as data is added or removed. With this data being dynamic, you won’t have to worry about missing data. If you use an Excel Table to supply data for your pivot table, the pivot table and your data will always be in synch.

Getting Started

Building a pivot table is not complicated. It only takes a minute (or less) if you have well-organized source data. Compare that to manually compiling data into a columns and rows for analysis.

Here’s the quick, five-step process to create your first pivot table.

  1. Select any cell in the source data
  2. On the Insert tab of the ribbon, click the PivotTable button
  3. In the Create PivotTable dialog box, check the data and click OK
  4. Drag a “label” field into the Row Labels area (e.g. product)
  5. Drag a numeric field into the Values area (e.g. quantity)

There are many websites and how-to videos on the web to help you get started. Here’s a particularly good one: Exceljet.net

One last bit of advice before you start. Plan before you build. Take some notes on what you are trying to measure or understand, and sketch out a few simple reports on a piece of paper. These simple notes can help guide you through the large number of choices you will have once you sit down at the computer. Keep it simple, and narrow your focus on the questions you need to answer.

Now you know how Excel can help you to speed up your data analysis. Go have some fun with it!

Make data analysis even easier. Let Visual Integrators get you started. Our goal is to save your business time and make technology work for you.

logoHome

410.549.9685

Microsoft Automation Saves Time!

What could normally take you three hours to complete, could take you three minutes!

With Microsoft Automation, there is no need for the tedious tasks like equations, copy and paste, and validation. Visual Integrators can automate those monotonous tasks for you, saving you time and headache.

Get a free consultation to see how and where we can save your business time. You might be surprised how much Microsoft Office Automation can streamline you company workflow!


How We Make Your Technology Work for You:

callout
callout
callout
request a free consultation